Issue 35 - Google Slides with Markdown and Understanding Senior Employees
Accelerate your slide development by turning Markdown into Google Slides and see how senior employees operate so you can move in that direction.

In this month's issue, you'll explore how senior employees operate so you can move in that direction. Then, you'll see how to accelerate your slide development by turning Markdown into Google Slides.
What Separates Juniors from Seniors?
The difference between junior and senior employees isn't about how long they've been in the role. It's about how they show up, how they think, and how they work with others.
Here are four areas where seniors stand out and how you can start making those shifts yourself.
Communication and alignment
Seniors stay curious about what their coworkers are doing. They're not just heads-down on their own tasks; they're thinking about how their work aligns with others. They might not love meetings, but they understand that clear communication helps the team move faster in the long run. Whether they are syncing with another team on shared goals or asking thoughtful questions in a project update, seniors know that solid communication prevents unnecessary rework and keeps things moving.
Juniors often focus on closing tickets and meeting their individual deadlines, which can lead to siloed efforts. It's easy to think, "I've done my part," without checking if it fits the bigger picture. Start by being curious about what others are working on. Ask questions like, "How does this connect to what you're doing?" or "Is there anything I should know to avoid overlap?" These small steps show that you're thinking about the team, not just yourself.
Big-Picture thinking
Seniors don't just focus on getting their tasks done--they think about why those tasks matter. They'll ask questions like, "How does this feature help our users?" or "How does this work support our team's goals?" They see their work in the context of the bigger picture, which helps them make better decisions.
Juniors can sometimes fall into the trap of just checking boxes. It's easy to think your job is done once your tasks are complete, but you're missing opportunities to add value if you don't understand why those tasks matter. Start asking questions. Understand the "why" behind what you're doing. Not only will it make your work more impactful, but it'll also show your team that you're thinking beyond your desk.
Proactive problem-solving
Seniors don't wait for someone else to tell them what to do. If something's broken, they'll take the first steps to fix it. They might not have all the answers right away, but they'll dig in and figure it out. For example, if a recurring bug keeps causing headaches, they'll investigate and propose a fix instead of passing it off as "not my problem." And because they understand the big picture and work to get aligned, they include others in the process rather than going and fixing it all on their own.
On the other hand, juniors often stop at identifying problems. That's fine early on, but it's not enough if you want to grow. When you spot an issue, take a moment to think about what could help. Work with others to identify the problem. Suggesting something even if you're unsure shows initiative and a willingness to learn.
Breadth of experience
Genuine seniors bring a breadth of experience. They've been exposed to different ways of working, often across multiple companies or industries. They've experienced enough to recognize patterns, avoid common pitfalls, and adapt to new challenges. For example, a senior engineer who's worked at a startup, a large enterprise, and a consulting firm has likely encountered a more comprehensive range of tools, processes, and team dynamics than someone who's spent their entire career at one company.
That's not to say you can't gain valuable experience staying at a single company. But if that's your path, you'll want to push yourself outside your comfort zone to gain more experience. Volunteer for cross-functional projects, learn how other teams operate, or contribute to open-source projects with others in the industry. The goal is to diversify your perspective so you're not just relying on "how things have always been done" where you work. Experience isn't about time spent but about how you spent that time.
Consider your next steps and create a consistent pattern of adopting and demonstrating these behaviors. The more you do, the more you'll look like the senior employee you aim to become.
Things to Explore
- I enrolled in AI in Education: Leveraging ChatGPT for Teaching, and I enjoyed the thought-provoking discussion and the prompting templates they provided. I also liked the thoughtful way the course was designed. I think it's a good model of what an online course should be.
- Check out Rive, an app for creating interactive animations. If you want to create some animations to accompany your content, this might be right up your alley.
- Remotion lets you use React to create video content, which could be handy for creating and maintaining video content for technical courses.
Create Google Slides with Pandoc
Creating slides in traditional presentation tools can be challenging, especially if you're working with technical concepts. You're probably already using Markdown to create other pieces of content, so you know the value it brings to quickly writing and formatting technical content. You can use Markdown to create slide decks, too. While there are tools that display Markdown documents as slides, you'll need the content in PowerPoint or Google Slides so that others can work with it as well. Pandoc makes this possible.
Pandoc is a command-line tool that converts documents from one format to another. You can use it to create PDFs, HTML pages, Word documents, and even Google Slides.
To explore this, you'll create a Markdown slide deck about Docker. Then, you'll use Pandoc to convert that file into PowerPoint slides, which you can import into Google Slides.
Before creating slides, you need to understand how Pandoc converts Markdown to PowerPoint slides. Here are the key elements:
- Title information uses
%at the start of lines. - Each level 1 heading (
#) creates a new slide. - Code blocks use triple backticks.
- Speaker notes use the ::: notes syntax.
- Notes can contain any valid Markdown.
With that out of the way, create your first deck.
Create a new file called docker-slides.md. Start by adding the presentation metadata to the file:
% title: Docker Quick Start
% author: Your Name
% date: November 30, 2024
These three lines create your title slide. The first line is your presentation title, the second is the presenter's name, and the third is the date.
Now, create the first content slide, which will be about creating Docker containers. Add this content after your title information:
# Creating a Container

Download the `ubuntu:latest` image and create a container:

```bash
$ docker run -it ubuntu:latest
```
::: notes
When you need a new container, this command gets you started.

- Creates and starts a container from the Ubuntu image
- `-i` keeps STDIN open so you can type commands
- `-t` gives you a proper terminal experience
- `ubuntu:latest` gets the newest Ubuntu version
:::
Let's break down this slide's structure:
# Creating a Containercreates a new slide with this title. Top-level Markdown headings create a new slide. You can also use a horizontal rule to specify a new slide.- The code block shows the command to run. Note that the code block specifies a language. Pandoc can perform some code highlighting for these code blocks.
- The
::: notessection contains your speaker notes. - You can include Markdown formatting within your notes, including lists and emphasis.
You can also include images, tables, and other Markdown features in your slides.
When creating your Markdown slides, watch out for these issues:
- Missing blank lines before and after code blocks.
- Using
##instead of#for slides - only level 1 headings create new slides. Use a horizontal rule if you need a new slide that doesn't have a title. - Using blockquotes (
>) instead of:::notes syntax for speaker notes. - Forgetting to close the notes section with
:::.
Add the following slides to complete your presentation:
# Connecting to Containers

Connect to a running container and run the `/bin/bash` shell:

```bash
$ docker exec -it container_name /bin/bash
```

::: notes
Need to connect to a running container? This is your command.

- Works on containers that are already running
- Gives you a shell prompt with `/bin/bash`
- Replace container_name with your actual container name
- Great for debugging or running one-off commands
:::

# Mounting Volumes

Make `/host/path` available in your container at `/container/path`:

```bash
$ docker run -v /host/path:/container/path image_name
```

::: notes
Keep your data safe even when containers stop.

- Files in /host/path on your computer show up in /container/path
- Changes in either location sync automatically
- Perfect for development when you're editing files
- Data stays around even if you remove the container
:::

# Port Forwarding

Map port `80` inside the container to `8080` on your machine:

```bash
$ docker run -p 8080:80 nginx
```

::: notes
Make your containerized services available on your computer.

- Maps port 80 inside the container to 8080 on your machine
- Access the service at localhost:8080
- Common when running web servers or APIs
- Change the ports to match your needs
:::
With your Markdown file complete, open your terminal and run:
$ pandoc docker-slides.md -o docker-slides.pptx
This creates docker-slides.pptx with:
- A title slide from your metadata.
- One slide per heading.
- Formatted code blocks.
- Speaker notes ready for presentation mode.
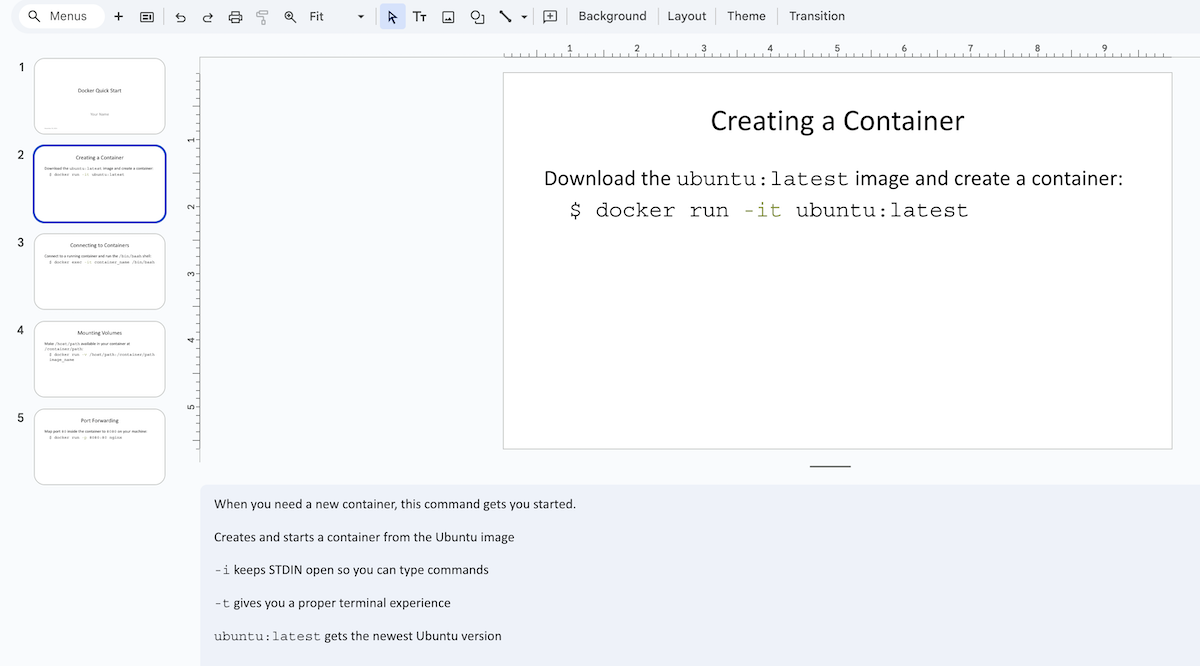
You can open this file in PowerPoint or import it into Google Slides and then continue editing. Here's the slide deck imported into Google Slides:

This process is excellent for creating a first draft, but you'll want to keep some things in mind as you iterate:
- Keep commands short - long commands are hard to read on slides
- Use speaker notes for details you'll explain verbally. Don't fill up the slides with too much text.
- Include example output when relevant.
- Test the text size in presentation mode before sharing.
This approach works great for creating a quick first draft of slides for any technical topic. You can build on this process, keep your slides in version control, and build a more extensive publication process around them.
Parting Thoughts
Try these things out before the next issue:
- Add a slide after the title slide that lists the topics the presentation covers.
- Experiment with code blocks and see how Pandoc highlights code.
- If you're more junior in your role, what concrete steps can you take to adopt more senior behaviors right now?
- If you're more senior, do a self-assessment. Are you "acting your role" and actively engaging your team and peers?
As always, thanks for reading. See you next month.
You just read issue #35 of Code, Content, and Career with Brian Hogan. You can also browse the full archives of this newsletter.